In a previous post, I discussed building a pipeline for processing receipt images. While the setup works for local development, it is not easy to deploy as it makes use of 2 different Huggingface models in addition to custom post-processing opencv code. An approach would be to wrap it around a framework such as pytorch but the issue of how to version and deploy models still poses an issue.
One solution I have found was to use Nvidia Triton Server, which is designed for deploying ML models including LLMs. It’s an OTS solution with the following features:
-
Support for various ML frameworks such as TF, Pytorch, scikitlearn means that you can run models built using these different frameworks and they can be accessed in the same way via the same client scrips.
-
Supports different backend types such as Onnx, pytorch and even custom python code.
-
Allows you to build model pipelines with support for Ensembles or Business Logic Scripting for more complex workflows.
-
Supports HTTP and GRPC protocols for client inference.
-
Built-in metrics endpoint for sending metrics to Prometheus for example.
For my use case, I identitied the key components for migration to Triton:
- Grounding-DINO HuggingFace model
- SAM HuggingFace model
- Custom OpenCV code for post processing
I decided to use the python backend as it allows me to wrap the HF models and custom logic into python classes which can be chained together to form an ensemble. This would support a single inference call which would simplify the workflow.
Below is an example of the python backend code for the grounding_dino_tiny model:
Each python backend model must begin with the same class name. In this example, we are using the same name of TritonPythonModel. Each class must implement the following methods:
- initialize ( required )
- execute ( required )
- finalize ( optional )
Both initialize and execute methods are required. initialize sets up the model which would include parsing the model config file values ( config.pbtxt ) via the args["model_config"] value and setting up the models. The execute function receives inference requests and passes the inputs in the requests to the model. The results are transformed into tensors and collated into objects of type InferenceResponse which are returned as a list. finalize is invoked at the end and is usually used for cleanup operations.
The core concept behind trition is the use of a model repository. The model repository is the storage area which holds all the models you want to serve via Trition. On startup, the server would traverse every single sub-directory in this path and registers every model with a config.pbtxt configuration file. Even if the backend types differ between each model but the configuration is valid, they will still be served by Trition.
The model repository needs to have the following structure:
/model_repository/
├── detection_postprocessing
│   ├── 1
│   │   └── model.py
│   └── config.pbtxt
|
├── grounding_dino_tiny
│   ├── 1
│   │   └── model.py
│   └── config.pbtxt
|
└── sam_vit
    ├── 1
    │   └── model.py
    └── config.pbtxt
From the above layout, the model repository contains 3 active models. Each model hosted has a version number as a folder which contains the model code. The default policy is to serve the latest model version which has the highest numerical value. One can also specify a certain version to use via the configuration file. The config.pbtxt specifies the configuration to apply to the model such as its name, backend type, and inputs and outputs data types and dimensions. For example, the config.pbtxt for grounding_dino_tiny model is as follows:
1
2
3
4
5
6
7
8
9
10
11
12
13
14
15
16
17
18
19
20
21
22
23
24
25
26
27
28
29
30
31
32
33
name: "grounding_dino_tiny"
backend: "python"

parameters: {
    key: "huggingface_model",
    value: {string_value: "IDEA-Research/grounding-dino-tiny"}
}

parameters {
    key: "box_threshold",
    value: {string_value: "0.3"}
}

parameters {
    key: "text_threshold",
    value: {string_value: "0.25"}
}

input [
    {
        name: "image_input"
        data_type: TYPE_FP32
        dims: [ -1, -1, -1, -1 ]
    }
]

output [
    {
        name: "bounding_box"
        data_type: TYPE_INT32
        dims: [ -1, -1 ]
    }
]
The backend field is set to python as we are wrapping the HF model within a custom python class which will be explained later. The model takes 3 parameters which are passed via the model_config object into the model class when instantiated. Note that parameter values can only be of string types. Next, we declare that the model has a single input of image_input of FP32 ( floating point 32 ) type and of shape [ batch_size, channel, height, width ]. A single output of INT32 ( integer 32 ) of shape [ batch_size, array ] is returned which contains the bounding box coordinates. The other models also have similar configuration files.
The use of inputs and outputs allow us to pass data between the client and the server but also between different models via the client code.
Running Triton Server
Given the above model repository structure, we can run triton on it to start inference. The recommendation is to use one of the pre-built images from Nvidia NGC catalogue as per the documentation. However, the image sizes are quite large, averaging at around 14.5 GB uncompressed. For this article, it will suffice. The version of the image to use depends on the CUDA version on your system. In my case, I opted for nvcr.io/nvidia/tritonserver:23.12-py3 as its compaitble with the older cuda version of 12.2.
To run the image, we can use the following command:
1
2
3
4
5
docker run --gpus=all -it --shm-size=1G --rm  \
  -p 8000:8000 -p 8001:8001 -p 8002:8002 \
  -v ./model_repository:/opt/tritonserver/model_repository \
  -v ./processed2/:/opt/tritonserver/processed2 \
  nvcr.io/nvidia/tritonserver:23.12-py3
Triton server exposes 3 main services:
- HTTP on port 8000
- GRPC on port 8001
- Metrics on port 8002
This provides the options of creating the client either via HTTP or GRPC. The metrics port also allow external systems such as Prometheus to monitor the server operations.
Next, we need to install some of the dependencies specific to our application:
1
pip install transformers torch pillow opencv-python-headless scikit-image scipy
Finally, we can start the triton server manually:
1
tritonserver --model-repository=model_repository
We are passing in the model repository path which was mounted via the docker run command earlier.
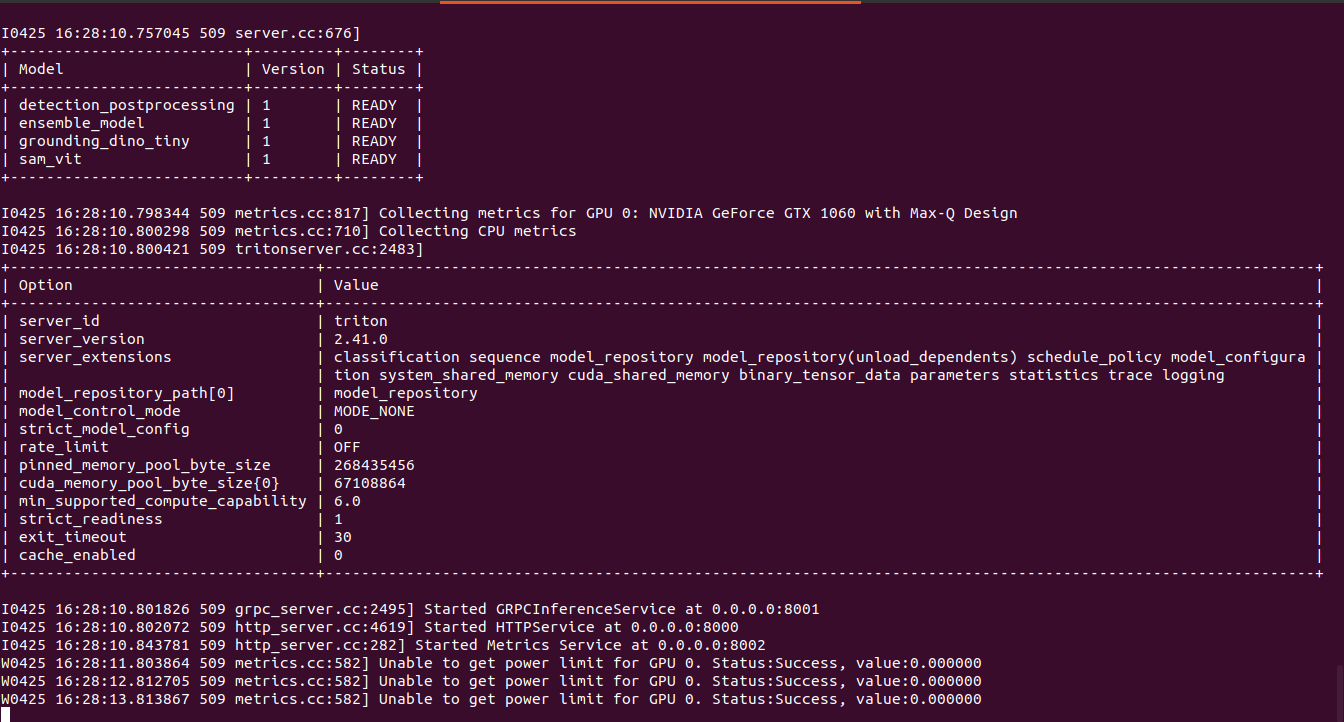
If the server is running and the models are loaded, we should see the following:
To check the health status, we can issue the following request against the HTTP endpoint. If it returns 200 as status code the server is healthy:
1
curl -v localhost:8000/v2/health/ready
To check if the models are loaded, the terminal output should indicate its status in a table with the heading of Model. A READY status next to the model name means its able to accept inference requests. Note that any errors in the configuration files or model code will cause the server not to start and an exception message will be shown.
By default, Triton will attempt to use all the GPUs it detects on your local system. If you intend to utilize GPU via docker, you need to enable Nvidia Container Toolkit with docker and get it working first.
In our use case above, we need to perform the following steps with Triton:
- Send an image to ground-dino-tiny model to obtain bounding-box coordinates
- If they exist, send them as inputs to the sam-model for obtain a segmentation mask
- If segmentation mask exists, send the image and mask to the detection postprocessing model to obtain the final artifact
While this works, this is not efficient as it would involve making 3 separate API calls to the inference server from the client. A better approach would be to use ensembles, which would invoke 1 API call to the inference server, which is discussed below.
Creating the ensemble
Before we create an ensemble, we need to create a python backend for each of the models discussed above.
To create an ensemble, we need to create an additional directory to host the ensemble model and a configuration file. The model version directory will be empty but is required. The updated directory structure is as follows:
./model_repository/
├── detection_postprocessing
│   ├── 1
│   │   └── model.py
│   └── config.pbtxt
├── ensemble_model
│   ├── 1
│   └── config.pbtxt
├── grounding_dino_tiny
│   ├── 1
│   │   └── model.py
│   └── config.pbtxt
└── sam_vit
    ├── 1
    │   └── model.py
    └── config.pbtxt
The config.pbtxt for ensemble_model is as follows:
name: "ensemble_model"
platform: "ensemble"
input: [
    {
        name: "ensemble_image_input"
        data_type: TYPE_FP32
        dims: [ -1, -1, -1, -1 ]
    },
    {
        name: "ensemble_image_basename"
        data_type: TYPE_STRING
        dims: [ -1 ]
    }
]
output: [
    {
        name: "ensemble_output"
        data_type: TYPE_STRING
        dims: [ -1 ]
    }
]

ensemble_scheduling {
    step [
        {
            model_name: "grounding_dino_tiny"
            model_version: -1
            input_map {
                key: "image_input"
                value: "ensemble_image_input"
            }
            output_map {
                key: "bounding_box"
                value: "dino_bounding_box"
            }
        },
        {
            model_name: "sam_vit"
            model_version: -1
            input_map {
                key: "bounding_box"
                value: "dino_bounding_box"
            }
            input_map {
                key: "image"
                value: "ensemble_image_input"
            }
            output_map {
                key: "mask"
                value: "sam_mask_output"
            }
        },
        {
            model_name: "detection_postprocessing"
            model_version: -1
            input_map {
                key: "image"
                value: "ensemble_image_input"
            }
            input_map {
                key: "mask"
                value: "sam_mask_output"
            }
            input_map {
                key: "basename"
                value: "ensemble_image_basename"
            }
            output_map {
                key: "img_path"
                value: "ensemble_output"
            }
        }
    ]
}
The configuration file specifies the inputs required. In this use case, we need to pass the image and the image name as inputs, which are specified in the inputs list. The output list defines a single output, which is the location of the output artifact storage.
The ensemble_scheduling block defines the stages of which models the inputs are routed to and how it passes the parameters between each stage of processing. For instance, the grounding_model_tiny model requires an input of image_input which is mapped via input_map to the ensemble input value ensemble_image_input. The bounding box coordinates are mapped via output_map to a value of dino_bounding_box. This output is passed to the second model sam_vit which maps the dino_bounding_box output to its input value of bounding_box. We are also passing in an earlier input of ensemble_image_input which is mapped to its input value of image.
This approach is more scalable as we are delegating the logic of how to invoke the various models and data flow to the Triton server. Our client code is also easier to understand as we don’t have to process intermediate data and control the flow of logic on the client side.
Below image shows the Triton server running locally through docker on a single GPU:
Creating the Triton Client
To send inference requests to the server, we need to create Triton clients using the triton client library. Firstly, we need to install the triton client:
pip install tritonclient[all]Triton client provides 2 main client types: HTTP and GRPC. In our example below, we are using the GRPC client:
1
2
3
4
5
6
7
8
9
10
11
12
13
14
15
16
17
18
19
20
21
22
23
24
25
26
27
28
29
30
import numpy as np
import tritonclient.grpc as grpcclient
from PIL import Image


if __name__ == "__main__":
   client = grpcclient.InferenceServerClient(url="localhost:8001")

   image = np.asarray(Image.open("receipt1.jpg")).astype(np.float32)
   image_data = np.expand_dims(image, axis=0)

    input_tensors = [
        grpcclient.InferInput("ensemble_image_input", image_data.shape, "FP32"),
        grpcclient.InferInput("ensemble_image_basename", [1], "BYTES")

    ]
    input_tensors[0].set_data_from_numpy(image_data)

    basename = "receipt1.jpg"
    np_input_data = np.asarray([basename], dtype=np.object_)
    input_tensors[1].set_data_from_numpy(np_input_data.reshape([1]))


    results = client.infer(
        model_name="ensemble_model",
        inputs=input_tensors
    )

    output_data = results.as_numpy("ensemble_output").astype(str)
    print(output_data) # /opt/tritonserver/processed2/processed_receipt1.jpg
The above client code shows a grpc client created via tritonclient.grpc.InferenceServerClient. We defined the localhost port to be 8001 as a Triton server runs grpc service on that port. Next, we load the image as a numpy array and set if as a tensor input value via grpc.InferInput. This object takes as parameters the inference input name, the dimensionality of the input and the data type of the input. Note that for strings, we need to set the dimensionality to be a list of 1 and the data type to be BYTES.
We invoke the inference via client.infer and pass in the input tensors and the model name. The results are converted back to numpy and cast as string. In this case, it returns the storage location of the artifact. Any exceptions from the model which result from running the client code will cause an exception in the client and it will indicate where the failure is in the corresponding model code.
The image below shows the scanned artifact created by the ensemble, which is identical to the output created by the previous pipeline:
To summarize, the use of Triton Server as an inference server has allowed us to simplify a previous machine learning pipeline which involves multiple intermediate steps into a single unified pipeline. Future posts will explore other features of Trition.
5T4Y CUR1OU5 !